Static Site AWS S3 Cloud Infrastructure
In this how-to guide I document the steps to create hosted static site S3 Infrastructure on AWS. The infrastructure is designed to be cost-effective, secure, and maintainable for a solo developer without dedicated development operations (devOps).
Information
Site Web Presence
- Production site with custom domain
- Staging site with subdomain
- Development site with subdomain
Inventory
For a static site hosted on AWS, the required cloud infrastructure is minimal and inexpensive. The main components are:
- Route 53 for a custom domain
- Certificate Manager (ACM) for https certificate
- CloudFront for CDN
- S3 buckets for static site hosting
- IAM roles and policies for secure access
Costs
Here are my monthly costs for hosting my blog with this infrastructure:
| Service | Monthly Cost | Notes |
|---|---|---|
| Custom Domain | $1.25 | $15/year registration renewal amortized |
| AWS Certificate Manager | free | Free for public certificates |
| AWS Route53 | $0.55 | 1 hosted zone, 0.40 per 1,000,000 queries for the first 1 Billion queries |
| AWS CloudFront | free | 1TB data transfer out, 10 million requests |
| AWS S3 | $0.05 | Requests per 10,000, first 50 TB / month of storage used, varies on demand |
| AWS CodePipeline/Build/Deploy | $0.00 | Free tier 100 build minutes/month, 1GB storage |
| Total | $1.85 | Approximate monthly cost per site |
Your costs may vary based on usage, data transfer, and additional services used.
Upgrades
For additional security and performance, you might consider upgrading to AWS CloudFront with WAF (Web Application Firewall). This provides enhanced security features and protection against common web exploits. With static-website hosting, this may be overkill, but for API Gateways or database access, it is worthy consideration.
| Service | Monthly Cost | Notes |
|---|---|---|
| AWS CloudFront Business WAF | $8.50 | WAF includes web traffic filtering, bot control, etc. |
Prod Infrastructure
Prod (Production) Infrastructure consists of cloud resources that host your web site for public viewing. For JAMStart, the prod infrastructure recommendations are:
- Custom Domain
- HTTPS Site Certificate
- AWS Route53 Hosted zone, subdomain redirect
- AWS CloudFront Distribution
- AWS S3 Bucket
Dev Infrastructure
For development and testing, you can create a similar infrastructure with subdomains. For example, if your custom domain is example.com, you can create a subdomain dev.example.com for development and testing purposes. This allows you to test changes without affecting the production site.
- Subdomain (dev.example.com)
- S3 Bucket for dev site
Staging Infrastructure
For staging, you can create another subdomain stage.example.com to test changes before deploying them to production. This allows for a final round of testing in an environment that closely resembles production.
- Subdomain (staging.example.com)
- S3 Bucket for staging site
How-to Guide
This section provides a step-by-step guide to creating the cloud infrastructure required to host a static site on AWS.
Custom Domain
You need a registered custom domain first. Yes, really. Create, transfer, and/or attach custom domain nameservers in AWS Route 53. Web registration at Amazon is $12-$15/year depending on the domain name. You can also transfer or connect to your domain from another registrar with AWS Route 531. Simplicity is best, so I recommend registering or transferring your domain to AWS Route 53.
Domain Registrar
You can register a new your domain 🌎 with AWS Route 53 or transfer your domain to AWS Route 53 from another registrar.
Route53 Hosted Zone
A hosted Zone is the set of domain and subdomain records for your site. It is required for your site to function. If you registered your domain with AWS Route 53, a hosted zone is automatically created for you. To see if you have a hosted zone, navigate to:
- Navigate to:
- AWS Route 53 → Hosted zones
- Look for your custom domain name in the hosted zone list.
- If found, open the hosted zone and double-check that it is 'Public hosted zone', which shows up as a tag next to the hosted zone name.
- If not found, you will need to create a hosted zone.
Create Hosted Zone
You can create a Hosted Zone by following these steps:
- Navigate to:
- Amazon Route 53 → Hosted zones → Create hosted zone
- Enter your custom domain name
- Choose 'Public hosted zone'
- Choose 'Create hosted zone'
Verify
A new hosted zone in Route53, should have two records in it.
| Record | Type | Value |
|---|---|---|
{custom domain name} | NS | {set of AWS name servers} |
{custom domain name} | SOA | {single AWS name server} |
Nameservers
Wherever your domain is registered, the domain needs to be updated with your name servers in the NS record in your hosted zone.
Route53 Domains
For domains registered with AWS, the names servers should already be correct, validate they are correct. For domains registered elsewhere but later transferred into AWS, you will need to update the name servers within AWS Route 53.
- Find your NS record name servers at:
- Amazon Route 53 → Hosted zones → (pick your hosted zone)
- Open the NS record
- find the nameservers. There should be four name server records with names like
ns-1247.awsdns-27.org,ns-614.awsdns-12.net, etc.
- find the nameservers. There should be four name server records with names like
- Find your registered domain names at
- Amazon Route 53 → Registered domains - (pick your custom domain)
- Validate that name servers are the same as the NS record, or update.
To update:
- Choose
Actionsdrop down andEdit nameservers - Replace the domain nameservers with your hosted zone NS record nameservers.
Note it can take up to 24 hours ⌛ for nameserver changes to propagate throughout the internet. You will need to wait that long in order to use DNS Validation for your site certificate.
Domains not on AWS
For domains that are not registered with AWS Route 53, you will need to update your domain registrar directly with these nameservers, by removing any name servers and adding the four from your hosted zone NS record.
Note it can take up to 48 hours ⌛ for nameserver changes to propagate throughout the internet.
S3 Buckets
Create three AWS S3 buckets to host your static site. For each bucket repeat this procedure:
- Create S3 Bucket with proper name
- Set Bucket Permissions for public object access
- Set Bucket Properties for static website hosting
You can use the AWS CLI (aws s3 mb <name>, etc.) for these steps but I will document the process using the AWS Console.
Create Bucket
- Make sure your bucket is in correct region close to your users, e.g.
us-east-1(N. Virginia) for east coast USA - Navigate to:
- Amazon S3 → Create bucket
- Choose 'General purpose' bucket
- Name the bucket exactly the same name as your Custom Domain or Subdomain, including the any periods
.and all lower-case. Otherwise, your endpoint will not be visible as an alias for the Route 53 record creation.- Production: You must name the S3 Bucket exactly the same name as your Custom Domain name, i.e. for
example.comcustom domain, create a bucket namedexample.com. - Staging: pick a subdomain name the same as your staging subdomain (or will be when you create it), i.e. for
stage.example.comsubdomain, create a bucket namedstage.example.com. - Development: pick a subdomain name the same as your development subdomain (or will be when you create it), i.e. for
dev.example.comsubdomain, create a bucket nameddev.example.com.
- Production: You must name the S3 Bucket exactly the same name as your Custom Domain name, i.e. for
- Leave the other options as default or you also use 'Copy settings from an existing bucket' to copy settings from a previous bucket.
- Choose 'Create Bucket' to create the bucket.
Bucket Permissions
After the bucket has been created, select your new bucket and choose the 'Permissions' tab.
- Set
Block public access (bucket settings)to Off, unchecked- you may have to acknowledge that you are allowing public access
- Add a Bucket Policy, choose 'Edit' under 'Bucket policy'
- Add the following JSON policy to allow public read access to objects in the bucket, replace
{{bucket_name}}with your bucket name for the bucket your are editing. e.g. fordev.example.combucket, replace{{bucket_name}}withdev.example.com.
{
    "Version": "2012-10-17",
    "Statement": [
        {
            "Sid": "PublicReadGetObject",
            "Effect": "Allow",
            "Principal": "*",
            "Action": "s3:GetObject",
            "Resource": "arn:aws:s3:::{{bucket_name}}/*"
        }
    ]
}
- Choose 'Save changes'
Bucket Properties
Change the bucket properties to set up website hosting.
Navigate to:
- Amazon S3 → (pick your bucket)
- Choose the 'Properties' tab and scroll down to 'Static website hosting', then choose 'Edit'.
- Set the following S3 bucket properties as appropriate.
| Property | State |
|---|---|
| Static website hosting | Enable |
| Hosting type | Host a static website |
| Index document | index.html |
| Error document - optional | 404.html (or whatever you have) |
S3 Logging - Optional
For monitoring and troubleshooting, you can (enable server access logging)https://docs.aws.amazon.com/AmazonS3/latest/userguide/LoggingWebsiteTraffic.html for your S3 buckets. This is optional but can be useful for tracking access to your site and diagnosing issues. You can set up a separate S3 bucket to store the logs, and configure your site buckets to log access to that bucket. This allows you to keep your logs organized and separate from your site content.
Log Bucket
Create a new bucket for logging and set up logging for your site bucket.
- In the same Region where you created the site buckets that are configured as static websites, create a single general purpose bucket for logging, for example
logs.example.com. - Create folders for every website bucket you want to track for the server access logging log files (for example, create
dev.logs,stage.logs, andcloudfront.logs(orprod.logsif not using CDN CloudFront) folders).
Bucket Logging Setup
For each site bucket you need to enable logging and point it to the log bucket and folder you created in the previous step.
- Back in the S3 buckets list, choose your site bucket, for example
dev.example.com. - Choose Properties.
- Under Server access logging, choose Edit.
- Choose Enable.
- Under the Target bucket, choose the log bucket and specific folder destination for the server access logs (browse or enter manually):
- Browse to the folder and bucket location:
- Choose Browse S3.
- Choose the bucket name, and then choose the logs folder.
- Choose Choose path.
- Manually enter the S3 bucket path, for example,
s3://logs.example.com/dev.logs/.
- Browse to the folder and bucket location:
- Choose Save changes.
- Repeat for each site bucket you want to track with server access logging.
In your log bucket, you can now access your logs. Amazon S3 writes website access logs to your log bucket every 2 hours.
Repeat bucket creation
Repeat the above steps to create S3 buckets for your staging and development subdomains if desired.
CloudFront
Create a CloudFront distribution to serve your static site from the S3 bucket with your custom domain and certificate, this also provides CDN caching and HTTPS support.
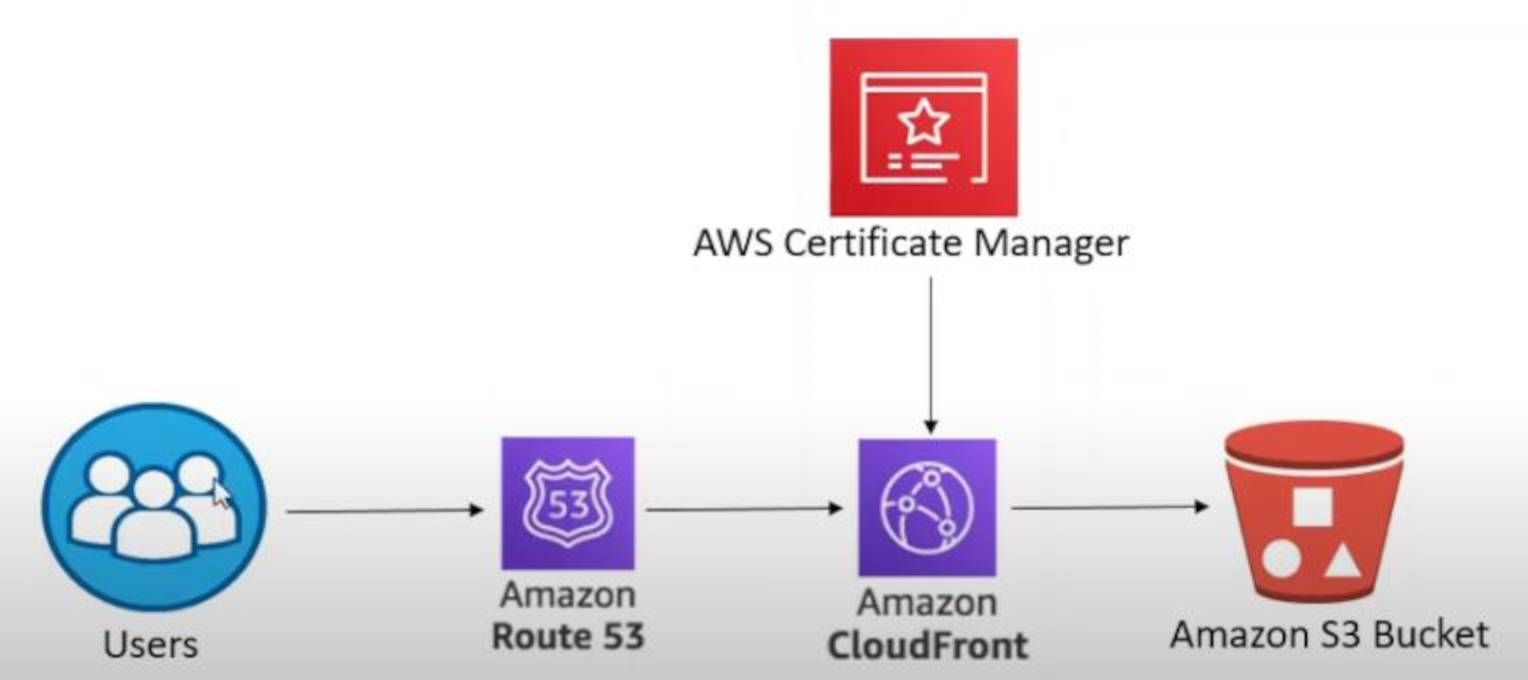
Chart showing site flowchart with Route 53, CloudFront, ACM and S3
Create CloudFront Distribution
Make sure you are in the 'us-east-1' (N. Virginia) region for CloudFront.
Navigate to:
- AWS CloudFront → Create Distribution
Use the step-by-step wizard to create the distribution.
| Step | Field | State | Notes |
|---|---|---|---|
| 1 | Choose a Plan | Free | Free is good, but you upgrade this later if necessary |
| 2 | Distribution Name | "{custom_domain_name} cloudfront" | just use your domain name, e.g. pennockprojects.com cloudfront |
| 2 | Domain | enter {custom_domain_name} | Choose 'Check domain', should get Domain managed by Route 53 |
| 2 | Add a subdomain | type www in the box next to custom_domain_name | add others as necessary |
| 3 | Origin type | Amazon S3 | just S3 |
| 3 | Origin : S3 origin | Choose "Browse S3" and select your S3 bucket | Choose 'Use website endpoint' |
| 3 | Settings | leave default | used recommended and defaults |
| 4 | Enable Security | Use the base level WAF - defaults | included in the plan at no charge |
| 5 | Get TLS certificate | choose 'Create certificate` | should complete quickly, you can also choose 'Create certification in ACM' and follow these instructions |
| 6 | Review and Create | Create Distribution | leave defaults |
Verify
Check your Route53 hosted zone. Navigate to:
- Amazon Route 53 → Hosted zones → (pick your hosted zone)
You should have three record types, with multiple CNAME records, in the hosted zone record set
- NS record
- SOA record
- CNAME record(s) for certificate verification for each domain name (2 if you included 'www')
Route53 Subdomains
These A-NAME record will not have TLS/HTTPS support and are for development purposes
The Cloudfront distribution covers your domain and www. subdomain with certificate TLS. For your other 'development' subdomains (stage. and dev.) you will need to add a subdomain A-NAME record in your hosted zone. You can also use this method for your main domain name if you do not want to use CloudFront with certificate TLS support.
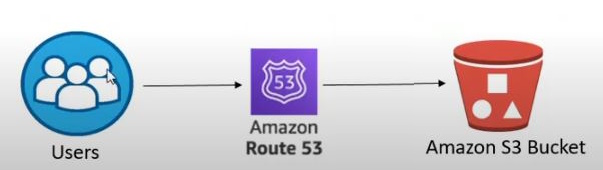
Chart showing User using Route53 A-NAME to S3 site bucket
Subdomain ANAME to S3 Bucket
Open your hosted zone. Navigate to:
- Amazon Route 53 → Hosted zones → (pick your hosted zone)
Choose 'Create record'
| Field | State |
|---|---|
| Record name | type dev. or stage. subdomain that match your S3 bucket name (leave blank for root domains) |
| Record type | A - Routes traffic to AWS resource |
| Alias | enable checkbox |
| Route traffic to | Choose 'Alias to S3 website endpoint` |
| Choose Region | (choose your region) |
| Choose S3 bucket endpoint | (pick your endpoint, should be in dropdown list) |
| Route traffic to endpoint | Alias to S3 website endpoint |
| Route traffic to region | (choose your region) |
| Enter S3 endpoint | (pick your endpoint, should be in dropdown list) |
| Routing policy | Simple routing |
| Evaluate target health | leave unchecked for subdomains, checked for domains |
Choose 'Create records' to create the ANAME record.
Verify
After creating the ANAME record and the bucket and deploying your site to it, you can validate that your subdomain opens your static site hosted from S3 after you deploy it. e.g. http://dev.example.com. Note the use of HTTP since there is no TLS/HTTPS support. Further, this will only work after your main domain certificate has been issued and the CloudFront distribution is deployed.
Conclusion
You now have the cloud infrastructure required to host a static site on AWS. Here are further relevant guides for your next steps:
- JAMStart Nuxt.js Site Template for creating a static site with Nuxt.js
- Static Site AWS CICD Pipeline for creating an automated pipeline to deploy your site to production.
Appendix
Manual Certificate
To request a new certificate 🎫 use the AWS certificate manager. You need to create the certificates from the Global From the AWS Console navigate to:
- AWS Certificate Manager → Certificates → Request
Certificate properties
Your custom domain name is required for the certificate, e.g. example.com It is recommended to include the 'www.' subdomain as well, e.g. www.example.com 2
For each domain name in the public certificate request you will need to create a CNAME record for DNS certification and an ANAME record for routing.
In AWS Certificate Manager choose 'Request a public certificate' and change the following, leaving other properties at default:
| Field | State |
|---|---|
| Domain names : Fully qualified domain names | custom_domain_name |
| Domain names : Add another name to this certificate | www.custom_domain_name |
| Validation method | DNS validation |
Then choose 'Request' to create the certificate request.
DNS Validation
DNS validation is for each domain name in the certificate you add a CNAME record to your hosted zone which prove that you own the domain for which you are requesting a certificate.
For DNS certificate validation you need a CNAME record to your AWS domain hosted zone for each domain or subdomain on the certificate request (2 if you choose to include www.). Conveniently from the certificate request details you can automatically create these records. Choose the 'create CNAME records' button.
🛑 Important - DNS validation requires these CNAME records to be created.
Verify CNAME records
Your hosted zone should now have at least two additional CNAME records in the record set, one for each domain name on the certificate request. Navigate to:
- Amazon Route 53 → Hosted zones → (pick your hosted zone)
- Look for the new CNAME records in the record set.
Check Certificate Status
Certificate Validation should complete in about 30 minutes to an hour after certificate request but can take longer. Go to:
- ACM → Certificates → (pick your certificate) To check the status, look in Certificate Status until is state changes to 'Issued'.
⌛ Wait for your certificate to validate before creating the CloudFront distribution.
Subdomain redirect
Optionally, if you've created your certificate and CloudFront distribution with 'www', you need to create an ANAME 'www' redirect. In your hosted zone choose 'Create record' for your root
| Field | State |
|---|---|
| Record name | 'www' |
| Record type | A - Routes traffic to AWS resource |
| Route traffic to endpoint | Alias to another record in this hosted zone |
| Route traffic to Choose record | (pick your ANAME domain without the 'www') |
Footnotes
Footnotes
- If you have a domain registered with another registrar, you can change the nameservers to point to AWS Route 53 and manage the DNS records in Route 53. ↩
- You can also include other subdomains such as 'blog.', 'shop.', 'stage.' etc. I recommend including subdomains separately rather than the subdomain wildcard
*.example.com. But for me, I just normally doexample.comandwww.example.com. ↩